✅ Now Live: Advanced Order Store for All Business Types – Rentals, Services, Subscriptions & More!✅ Now Live: Advanced Order Store for All Business Types – Rentals, Services, Subscriptions & More!✅ Now Live: Advanced Order Store for All Business Types – Rentals, Services, Subscriptions & More!✅ Now Live: Advanced Order Store for All Business Types – Rentals, Services, Subscriptions & More!✅ Now Live: Advanced Order Store for All Business Types – Rentals, Services, Subscriptions & More!✅ Now Live: Advanced Order Store for All Business Types – Rentals, Services, Subscriptions & More!✅ Now Live: Advanced Order Store for All Business Types – Rentals, Services, Subscriptions & More!✅ Now Live: Advanced Order Store for All Business Types – Rentals, Services, Subscriptions & More!✅ Now Live: Advanced Order Store for All Business Types – Rentals, Services, Subscriptions & More!✅ Now Live: Advanced Order Store for All Business Types – Rentals, Services, Subscriptions & More!
Outline Utility Classes
In this lesson, we will delve into the Tailwind CSS outline classes. To begin, we'll clarify the distinction between borders and outlines. Afterward, we'll explore the diverse methods available for styling and coloring outlines, equipping you with the knowledge to enhance the visual presentation of your web elements.
In Tailwind CSS, there are utilities for applying outlines to elements, typically used for focus states. Tailwind provides classes for outline style, width, color, and offset. Lets first understand the difference between border and outline.
Difference Between Border and Outline in CSS
The concepts of border and outline in CSS, while visually similar, have distinct characteristics and use-cases:
Border:
- Part of Box Model: A border is part of the box model. It affects the overall layout of an element because it takes up space in the layout. The width of the border is added to the total size of the element.
- Styling: Borders can have varying styles, widths, and colors on different sides of an element.
- Impact on Element's Size: Since borders are part of the box model, they contribute to the total width and height of an element. If you add a border to an element, its size increases unless you adjust the padding or width/height to compensate.
Outline:
- Not Part of Box Model: An outline is not part of the box model, meaning it doesn’t take up space and doesn't affect the layout. It's drawn over the element and does not add to its size.
- Same Around the Element: Outlines are the same on all sides of an element; you cannot specify a different outline for individual sides.
- Does Not Affect Size: Adding an outline to an element doesn’t change its size, making it useful for focus states or highlighting without affecting layout.
- Used for Accessibility: Outlines are commonly used to show focus on elements, especially for keyboard navigation for accessibility purposes.
Scenarios Where Outline is Helpful
- Focus Indication: Outlines are widely used to indicate focus on interactive elements like buttons, input fields, and links. This is crucial for keyboard navigation and accessibility.
- Highlighting Elements: Use outlines to highlight elements without affecting their size or layout, such as highlighting a selected item in a list or grid.
- Visual Feedback: Outlines can provide visual feedback on interaction without causing layout shifts, such as showing an outline on a hovered card in a UI.
- Non-Disruptive Decorations: When you need to add a border-like effect without changing the element's size or layout, an outline is a good choice.
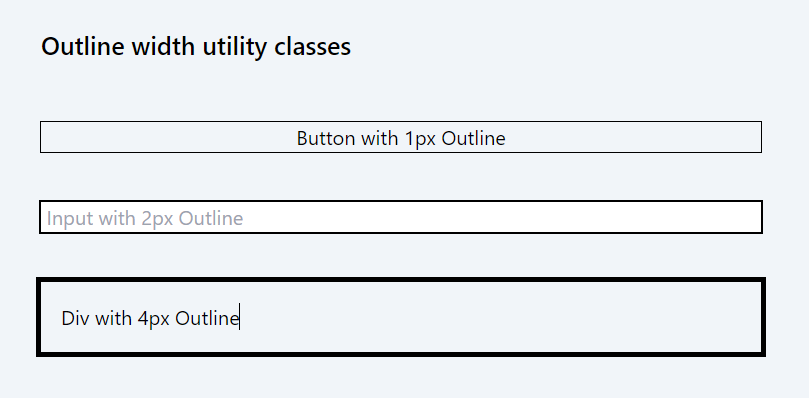
Outline width utility classes
Tailwind CSS provides utility classes for controlling the width of the outline around an element. These classes allow you to quickly adjust the thickness of the outline to suit your design needs.
- outline-0: Sets the outline width to 0px, effectively removing the outline. It's equivalent to outline-width: 0px; in CSS. This class can be used when you want to disable the default outline, often for custom styling purposes.
- outline-1: Applies a 1px wide outline around the element. This class is useful for subtly highlighting an element, such as showing focus on input fields or buttons. It translates to outline-width: 1px; in CSS.
- outline-2: Sets the outline width to 2px, creating a more noticeable outline than outline-1. This width is often used for elements that need a stronger visual emphasis. It corresponds to outline-width: 2px;.
- outline-4: Increases the outline width to 4px. This class is suitable for cases where a bold outline is desired to draw significant attention or provide a strong visual cue. It's equivalent to outline-width: 4px;.
- outline-8: Applies an 8px wide outline, which is quite thick and highly noticeable. This class can be used for strong visual emphasis or decorative purposes. It corresponds to outline-width: 8px;.
Code Snippet
<div className='w-1/2 my-10 flex flex-col gap-10'> <h2 className='my-2 font-medium text-xl'>Outline width utility classes</h2> <button className="outline outline-1">Button with 1px Outline</button> <input type="text" className="outline outline-2" placeholder=" Input with 2px Outline" /> <div className="outline outline-4 p-4">Div with 4px Outline</div> </div>
When using Tailwind CSS to apply outline styles to an element, it's important to use the outline class as the base class. This class sets the foundation for the outline, to which you can then add other outline classes. The outline class ensures that an outline is defined and visible, making the additional style classes effective.
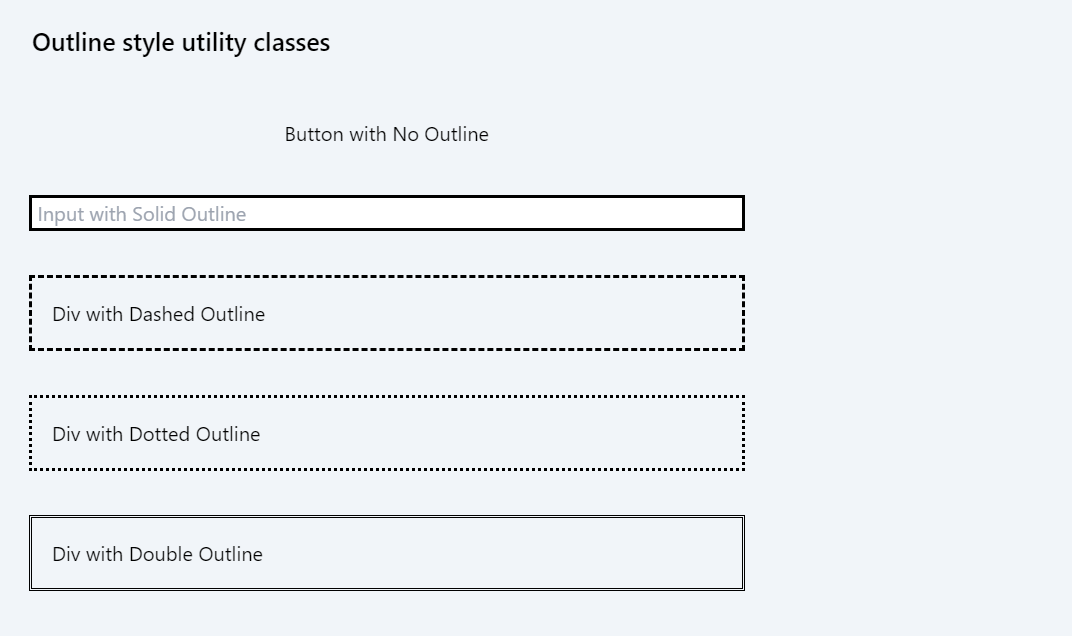
Outline style utility classes
Tailwind CSS provides outline-style utility classes to customize the style of outlines around elements. These classes allow you to define how the outline looks, whether it's solid, dashed, dotted, or double.
- outline-none: This class is used to remove the outline from an element. It sets the outline to a 2px solid transparent border and an outline offset of 2px. It's equivalent to outline: 2px solid transparent; outline-offset: 2px; in CSS. This is typically used to remove default browser outline styles, often for custom styling purposes.
- outline: Sets the outline style to solid, which is the default style for outlines. It's equivalent to outline-style: solid; in CSS. This class is used when you want a continuous, unbroken outline around an element.
- outline-dashed: Applies a dashed style to the outline, creating a series of short dashes. This class is equivalent to outline-style: dashed; in CSS. It can be used for decorative purposes or to draw attention to an element in a less conventional way.
- outline-dotted: Sets the outline style to dotted, consisting of a series of dots. This is equivalent to outline-style: dotted; in CSS. The dotted style is often used for a subtle emphasis or decorative styling.
- outline-double: Creates a double outline, which consists of two solid lines with some space between them. It corresponds to outline-style: double; in CSS. This style is less common but can be used to create a more pronounced and decorative outline effect.
Code Snippet
<div className='w-1/2 my-10 flex flex-col gap-10'> <h2 className='my-2 font-medium text-xl'>Outline style utility classes</h2> <button className="outline-none">Button with No Outline</button> <input type="text" className="outline" placeholder=" Input with Solid Outline"/> <div className="outline-dashed p-4">Div with Dashed Outline</div> <div className="outline-dotted p-4">Div with Dotted Outline</div> <div className="outline-double p-4">Div with Double Outline</div> </div>
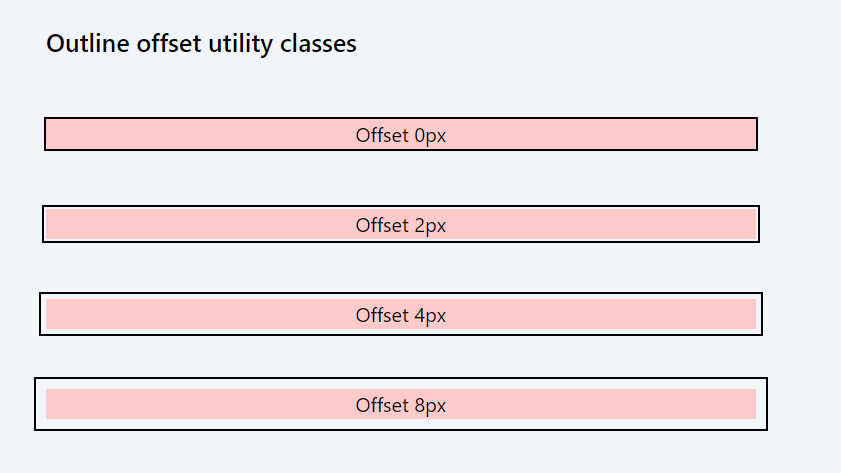
Outline offset utility classes
Tailwind CSS's outline-offset classes are used to control the space between an outline and the edge of an element. These utilities are particularly useful for creating visual effects or improving accessibility by making outlines more prominent. Here's an explanation of each class:
- outline-offset-0: Sets the outline offset to 0px, which means the outline will be directly on the edge of the element, with no space between the element's border and the outline. It's equivalent to outline-offset: 0px; in CSS.
- outline-offset-1: Applies a 1px offset to the outline. This creates a small gap between the element's border and the outline, giving the outline a slightly separated look. It translates to outline-offset: 1px;.
- outline-offset-2: Increases the offset to 2px, creating a more noticeable space between the element's border and the outline. It corresponds to outline-offset: 2px; in CSS.
- outline-offset-4: Sets the outline offset to 4px, further separating the outline from the element's edge. This can enhance the visual impact of the outline, especially on elements with thicker borders. It's equivalent to outline-offset: 4px;.
- outline-offset-8: Applies an 8px offset, which is quite large and creates a significant space between the element's border and the outline. It's used for creating a pronounced outline effect and corresponds to outline-offset: 8px;.
Code Snippet
<div className='w-1/2 my-10 flex flex-col gap-10'> <h2 className='my-2 font-medium text-xl'>Outline offset utility classes</h2> <button className="outline outline-2 outline-offset-0 bg-red-200">Offset 0px</button> <button className="outline outline-2 outline-offset-2 mt-2 bg-red-200">Offset 2px</button> <button className="outline outline-2 outline-offset-4 mt-2 bg-red-200">Offset 4px</button> <button className="outline outline-2 outline-offset-8 mt-2 bg-red-200">Offset 8px</button> </div>
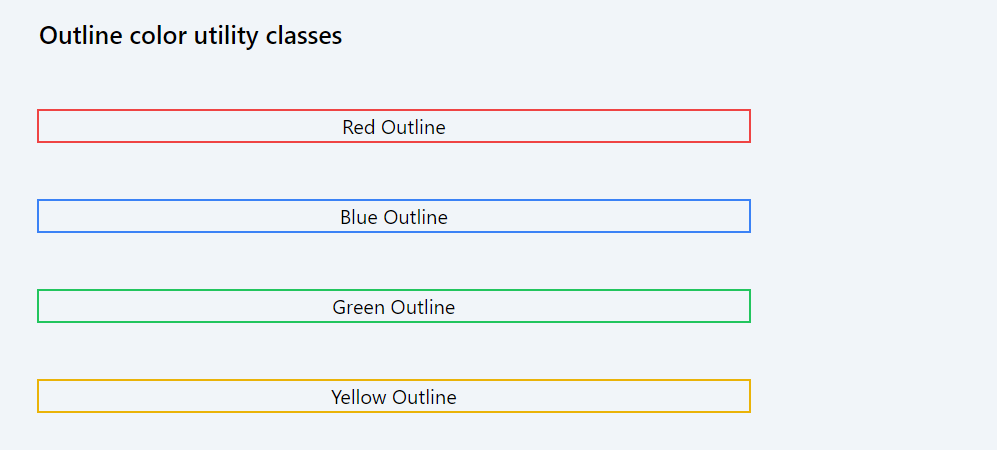
Outline color utility classes
Tailwind CSS's outline-color classes allow you to specify the color of the outline around an element. These utility classes offer a straightforward way to customize the outline's appearance to fit your design requirements.
The outline color classes in Tailwind CSS follow the pattern outline-{color}, where {color} represents the color name. The color can be from Tailwind's default color palette, which includes a variety of shades for each color.
Standard Colors:
- outline-black: Sets the outline color to black.
- outline-white: Sets the outline color to white.
Color Palette Shades:
Tailwind provides a range of shades for each color in its palette. The pattern is outline-{color}-{shade}, where {color} is the color name, and {shade} is the intensity of the color. For instance:
- outline-gray-{50-900}: Shades of gray, e.g., outline-gray-500.
- outline-red-{50-900}: Shades of red, e.g., outline-red-500.
- outline-blue-{50-900}: Shades of blue, e.g., outline-blue-500.
- outline-green-{50-900}: Shades of green, e.g., outline-green-500.
- outline-yellow-{50-900}: Shades of yellow, e.g., outline-yellow-500.
- outline-indigo-{50-900}: Shades of indigo, e.g., outline-indigo-500.
- outline-purple-{50-900}: Shades of purple, e.g., outline-purple-500.
- outline-pink-{50-900}: Shades of pink, e.g., outline-pink-500.
Transparent and Current Color:
- outline-transparent: Makes the outline color transparent.
- outline-current: Sets the outline color to the current color of the element.
Code Snippet
<div className='w-1/2 my-10 flex flex-col gap-10'> <h2 className='my-2 font-medium text-xl'>Outline color utility classes</h2> <button className="outline outline-2 outline-red-500">Red Outline</button> <button className="outline outline-2 outline-blue-500 mt-2">Blue Outline</button> <button className="outline outline-2 outline-green-500 mt-2">Green Outline</button> <button className="outline outline-2 outline-yellow-500 mt-2">Yellow Outline</button> </div>
Balancing Design and Accessibility: A Practical Approach
The outline-transparent class in Tailwind CSS is used to set the color of an element's outline to transparent. This utility class effectively makes the outline invisible, while keeping the outline itself intact. The primary use of outline-transparent is in scenarios where you want to retain the outline for structural or accessibility reasons but do not want it to be visible.
Key Use-Cases of outline-transparent:
- Accessibility and Focus Management: When designing interactive web elements like buttons or form inputs, it’s important to maintain a focus outline for accessibility purposes, especially for keyboard navigation. However, there are cases where you might not want this outline to be visible. In such scenarios, outline-transparent can be used to hide the visual aspect of the outline while preserving its functionality.
- Styling Interactions Without Visual Outlines: Sometimes, you might want to style interactive elements differently, like changing background color or border on focus, instead of showing an outline. Using outline-transparent ensures that the default focus outline doesn't interfere with your custom styling.
- Maintaining Layout Consistency: Since outlines do not take up space in the box model, making an outline transparent instead of removing it altogether can help maintain layout consistency during state changes (like focus or hover) without causing shifts or jumps in the layout.
Dive into the essentials of padding and spacing to master layout design in web pages and apps. Understand how these key concepts help in organizing, aligning, and separating elements for improved user experience and content presentation.
All Modules